Monday, October 26, 2009

Fall Pickings

Hi Knitters,
Two weekends ago we gathered up the kids and went pumpkin and apple picking at a nearby farm. I treasure these traditions with my kids especially as they are getting older. It was the kind of gorgeous fall day which have been few and far between this year. We took full advantage.
The farm we always visit has some enormous carts filled with pumpkins toward the entrance to the farm. This year they were packed with the most beautiful variety of pumpkins.
First we headed out to the pumpkin fields because the kids really enjoy picking their pumpkins right off the lot. Unfortunately, we only found a couple of good pumpkins in the fields this year so we came back to the carts and finished out our selection. That's my nephew in the orange jacket.
Now that the kids are older they do all of the work so that's kind of nice.
My sister met us over at the farm. She is wearing a hat she knitted a couple of years ago. She bought the yarn in NYC at the yarn shop where she sat and knitted with Bette Midler and Cecily Tyson. Remember that? Those were some good times from my last book tour. Anyway, it's a super cute hat and I love the mega-tassel she made. Fun memories.
Siblings marching up the path to the apple orchard and carrying the apple picking bag. New rules at the farm make you pre-purchase the bag and listen to a brief lecture before you can go picking. There must have been some apple thievery and mischief taking place.
The trees were absolutely packed with apples, more than ever.
The Collector is in her glory.
I love the little things at the farm like the old and worn signs along the edge of the path telling you what kind of apples are found in that certain row of trees. I had never heard of Northern Spy apples, have you?
The kids are getting so tall. They can reach way higher than I can.
The Collector and I stay closer to the ground. I love the dirty hands. There was a lot of sampling going on which I am sure breaks a rule or two.
The trees provided a wonderful view.
Brothers always amaze me in any family by how similar and different they are at the same time.
A bite or two never hurt anybody, right?
The Collector ran back to grab a couple extra apples to feed to the horses on the way out.
Our work was done. We had five enormous pumpkins and a large bag of apples in our possession. Needless to say, I've been making apple crisp and applesauce ever since. Our house has been smelling of cinnamon and apples for days.

It's Monday already and I can't believe it. Have a good week, Knitters.
best, susie

Friday, October 23, 2009

Fall Crafts with the Girl Scouts


Hi Knitters,
Last week I hosted The Collector's Girl Scout troop for a fall crafting session. We had three projects to master in about an hour. The main project was to make the turkeys you see above, those are the samples The Collector made. I had done these same turkeys with my older daughter's troop at least five or six years ago. Back then I saw a version of this project either in a Martha Stewart magazine or on her show. I can't remember. I looked on her website but I didn't see anything that resembled this project. So I didn't originate the autumn leaf turkey idea but we definitely made them our own with a bunch of changes from the original.
When teaching or crafting with large groups, I think we had around 10 girls, success is all in the preparation. Ahead of time, I once again, got my trusty glue gun out and glued large cinnamon scented pine cones (the girls loved the scent, bought at JoAnn's) to thin wooden rounds (bought at a local craft shop). Next, I hot glued a tiny pine cone to the large pine cone for the turkey's head. This all had to be done ahead of time.
The preparation photos are at my house but the meeting with the girls was held at a public library where I reserved a big community room. It was perfect with big, long tables, tons of chairs, a bathroom right next door and lots of room for moving about.

Here is a list of what you need to make your own Autumn Leaf Turkeys:
1. fall leaves (we used fake but real leaves would be fantastic only not as lasting)
Note: For the leaves, I found plain leaves but I also found some fantastic leaves that were sprinkled with gold glitter at JoAnn's and the girls loved them!
2. other fall foliage (I bought that long garnish with orange and red strands and tiny berries and I found some red berries that you can see in the first photo)
3. pipe cleaners (red for feet and other fall colors for decoration)
4. small felt squares for the girls to cut on their own (yellow for beak, red for the waddle)
5. google eyes (a crafting must)
6. large pine cones
7. tiny pine cones
8. wood base (purchased at JoAnn's for around 50 cents)
9. craft glue for the girls to use for decorating
10. scissors
11. glue gun for adult set up of pine cones

I set up wax paper bags(love these and you can get them at any grocery), each labeled with their names. In the bags I filled all of the necessary pieces to make their turkey. The leaves and garnishes were spread out on the tables for easy access along with glue and scissors.

Also, in the wax paper bag I put in the makings for Betz's Felt Ball Acorns, one of my favorites. (You can see these acorns and get all links here, plus I did a knitted version here.) This was our next craft after the Autumn Leaf Turkeys.

The Collector had been collecting acorns and acorn tops for a couple of weeks for this project. I had a pretty good supply of felted balls but not a ton. I divvied up 3 felted balls per girl and three acorn tops for gluing. The felted acorns are special in my eyes so they just did a few of those. We had a lot more acorn tops so I bought some fuzzy pom-poms at the craft store and let the girls go to town gluing in the pom-poms in the rest of the tops. They loved it.
Um, just look at that expression and tell me you don't see pride. That's a proud turkey-maker if I've ever seen one. The turkeys took on personalities of their own. Do you see that this turkey has a hair-do? Love it. This girl makes me smile. She helped The Collector gather pine cones and acorns after school one day prior to the meeting.
The Collector helped make all of the samples and prepped and packed all of the materials with me. For a craft meeting you have to bring completed samples, organize the materials, pack the wax paper bags and plan a strategy. She was an all-around joyful crafting helper for the meeting. She is destined to be some kind of teacher or instructor of some sort. She has the knack and she likes doing it.

The best part of the meeting is when the girls are crafting. They have such unguarded conversation. They are looking down and working on their projects and they never stop talking the entire time. It is so fun and funny to listen to them chat. It really is the best part. Crafting brings out personalities in a big way. This troop is full of girls who love to make things. You can just feel the excitement when they walk in the door to a crafting meeting.
This girl is a major maker. She took an art class with The Collector last spring. You can see her acorns, too. Her mom loved the turkeys so much that she wants to use them as place cards at her Thanksgiving table and they are having a large group over. When I saw her a few days later she told me that she had gone out to buy all of the makings for lots more turkeys for her kids to make. It would make for a great table to have a group of these turkeys as a center piece, too.
The girls moved around to different work stations after they completed their turkeys to do the second and third craft projects. It is always good to have a sitting down time and then to allow some movement for the kids.

Another trick I do every time is when we come in to the meeting we all wash hands or use hand-sanitizer, then the girls all sit down to have a snack and a drink. I got an assortment of fresh bagels and strawberry and plain cream cheese. I had the bagel shop slice all of the bagels for me. I gave each bagel a good smear of cream cheese and sandwiched them back together. Next, I quartered each bagel sandwich. This is perfect because then the kids can take a quarter bagel at a time and there isn't as much waste. The bagels were a huge hit, too , and the strawberry cream cheese on the plain bagel was the most popular, fyi.

I use this starting time while they are eating and drinking to give large group instructions on the activities for the day. They are usually quiet and hungry at this time so you can get some good listening time. Plus, when there isn't a lot of extra time you can get two things done at once. The kids eat and I talk and demonstrate. It works really well.
Here is my smart cookie from the knitting meetings last spring. She is even wearing her same hat! She is a good and thorough little crafter and she's very entertaining along the way with a sharp sense of humor. The Collector was in preschool with this one so they go way back.
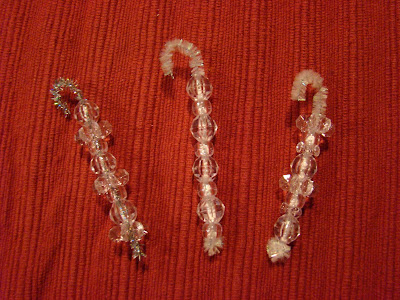
The third craft we did was to make Icicles. I've done pipe cleaner Icicles with kindergarten classes all the way through 5th graders. I loved the reaction of the girls when I showed them the icicles. There were gasps and oohs and aahs. This is a simple project with hardly any prep work. I found sparkly pipe cleaners and cut them into 4-5 inch pieces. I bent one end to hold the beads on the pipe cleaner. I bought all kinds of clear plastic beads in different shapes and sizes, even star shaped ones.

The girls simply slide the beads on in any order they choose and leave enough of the pipe cleaner exposed at the end to make a hook. We hang these all over our Christmas tree but I like them because they are just winter/snow/ice themed and not a religious holiday theme. We have a good mix of backgrounds in our group and I always strive to be inclusive of everyone with the projects we do. This is a great project and the girls could not get enough of making the icicles. They even took extra pipe cleaners and beads with them to make more at home.
Icicle making in progress. Love how they stand so close to each other.
Cute as a button. Can't you just feel her joy in her crafting? She is a sweet soul through and through. Check out the pipe cleaner swirl on that turkey.
Aren't they cute? I can't get over it. Chat and chuckle.
This one loves crafting, lots of excitement from her.
We had some smaller pine cones that The Collector gathered from a park up the street and some girls made some pine cone art with those as well. The pine cone on the left looked like a fall bouquet from the top view. This sweetheart completed a knitted hat last spring that was donated to charity. She is a good little knitter.
Here's the whole group. I made them whisper "turkey" when I took the photo. They thought that was funny. There are two girls missing from the group, one left early and one couldn't make it, she is coming over today after school for a private turkey/acorn/icicle session. Should be fun.

There are several girls I didn't get good individual photos of and I apologize for that if they are looking at this post. Next time I will!

There you have it! Maybe some of you can use these ideas for some fun fall crafting with your kids or scout troops this fall.

Have a good weekend, Knitters.
best, susie

Tuesday, October 20, 2009

Molly's Mittens & Matching Hat!

Hi Knitters,
My son recently asked me to knit a pair of mittens for his friend, Molly. I gladly obliged. I had a bunch of colors in the Valley Yarns Berkshire Bulky in a bin in my basement from last year. I had plans to design some mittens in this yarn and I never got around to it. I had knitted my son a pair of green and white mittens in this yarn last year and he loves them.
Here is some information you might like to know for Molly's Mittens:
Size: To fit an average-size woman’s or older child’s hands. The length of the hand and thumb can be varied to fit a variety of sizes. The yarn stretches and softens with wear so a tighter fit at first is a good thing.
Finished hand circumference, measured around the knuckles on the hand, to fit 7 to 8 inches.
Yarn: Valley Yarns Berkshire Bulky (85% Wool, 15% Alpaca; 108 yards/100grams), 1 skein each in Stone Blue #38 and Natural #01
Needles: US size 10 double pointed needles, set of four OR size to obtain gauge
Gauge: 3 ½ stitches per inch in stockinette stitch and 6 rounds per inch
Materials:
2 stitch markers
Scrap yarn
Ruler or tape measure
Yarn needle
Scissors
The mittens would be great in one colorway for a solid mitt or striped throughout! There are so many color choices for this yarn and it is only $4.99 for a ball. You could make some fantastic mittens for gifts and save a penny or two while you're at it.

The pattern is available for purchase for $3.00 in my pattern shop.

Click here to purchase the pattern for Molly's Mittens!
So this morning I was looking at the left over yarn from Molly's Mittens and I wondered if I could get a good size hat out of the rest. Well, sure enough I could! This means there is another pattern available for you. You don't need to buy any more Berkshire Bulky to make this hat and the mittens combined. One skein of each color will do the trick for both projects. Talk about a great value.

I used a US size 10 sixteen inch circular needle and a set of four US size 10 double-pointed needles to whip up Molly's Matching Hat.
This hat is sized to fit an average adult woman's head or a medium to large child's head. The circumference of the finished hat is 20 inches and will stretch to accommodate up to a 22 inch head. The yarn stretches and softens slightly with wear so a tighter fit to start with is a good thing.
Since the hat was an add on I am only charging $2.00 for Molly's Matching Hat pattern!


Now if you purchase both Molly's Mittens and Molly's Matching Hat together I will send you both patterns for only $4.00.


Please remember if you order a pattern from my shop that I personally send out all of my pattern orders. If there is a slight delay in getting your pattern please be patient. I try to be as efficient as possible.

I think I covered everything.
Thanks, Knitters.
best, susie

Monday, October 19, 2009

Catching Up

Edited to add: I just made these mittens available in my shop right now! Click here for information. I will do a full post on the back story tomorrow.
Hi Knitters,
I have such a backlog of things I want to share with you. The photo above is my latest pattern for my pattern shop. It is all set to go, I just have to get it up and available for purchase on my shop. Maybe even later today or tomorrow. I've had the yarn to design these for at least a year so it feels good to get them done.

I will do a full write up with more information when the the pattern is ready to go. I am pretty excited about these simple and super fast mittens, knitted on size 10 double-pointed needles. I think you'll love them for your holiday/winter knitting projects. You could make a million pairs in a jiffy. The pattern is called, Molly's Mittens. Look for it soon...
I need to tell you that Alana Dakos (Did you listen to her 3 year old daughter here? It's only about 30 seconds long.) is hosting a giveaway for a signed (by me:) copy of Itty-Bitty Toys. All you need to do is leave a comment on this post to enter. That's it. She is leaving the contest open until November 1st! Now hop on over and enter so you don't miss out. I'd love to send you a book.

The wonderful Guido Stein, released his latest podcast episode #71 for It's a Purl Man, where he interviewed me about Itty-Bitty Toys and Spud & Chloë. It is a great chat. I love the way he cares for the sound quality and his interviewing style can't be beat. I am a big fan. This is about a 30 minute interview. Click here to listen or go to itunes to download it there, if you are interested, of course. This is one of my most favorite interviews to date. Thanks for having me, Guido.
Here is my beloved, cute sister in our last quilting class. Did I tell you that we made matching fall-themed quilts? I may have but there you go. We sat across from each other on two large tables pushed together. It was really fun. I made sure to include the incredible quilt behind her so you could get a glimpse of it. Stitcher's Crossing has the most amazing quilts sprinkled throughout the shop.
We took the class at Stitcher's Crossing, which I know I have mentioned before, and I'll say it again, this is a fantastic quilt/yarn shop that is a must see if you are in town. My lovely (and tall:) instructor, Anne Smith, did a beautiful job of guiding our beginning group of quilters and sewers. All eight students walked away with huge amounts of new knowledge, confidence and a mostly completed quilt. That's pretty good.

The binding on my quilt in the photo wasn't done but now my quilt is completely finished. I hand stitched the binding on right after the last class and tossed it in the washer and dryer (per directions) to soften it up. Now The Collector is wrapping her baby up in it and my older kids are using it as a lap quilt to snuggle with on the couch. It makes me feel so good. In fact, I can't even believe I sewed that quilt at all. Amazing.

Check out Anne's website here. Her daughter did all of the design work for the site. Anne offers quilting services, too. She is very talented. As a teacher, she did the best job of making everyone feel good and at ease by telling us about her mistakes and how she has made every mistake in the book and how there is nothing that can't be fixed. Anne has been teaching quilting for about 15 years and you can tell that she is a seasoned teacher. That's the best. She offered in-class ripping out services and would walk around with her seam ripper at the ready to help:)

It was a great time and I plan to squeeze in a couple more of her classes in the future (my fingers are crossed that I'll have time). I learned an incredible amount of information in a short few weeks. Plus, it was just good and simple practice for me. Everyone needs lots of that. I highly recommend taking this class if you are in the area. Thanks to Anne for a fun time and for helping me on my sewing journey! I love to sew and stitch.

Like I said, I have so much more to tell you. I hosted The Collector's girl scout troop for some fall crafting last week and we had a bountiful session. I have lots of fun photos to share of the wonderful girl scouts coming up. You may want to steal a couple of the crafts I did with them for your own kids.

I will get that mitten pattern up shortly. I will see if I can do it or whether my son will have to help me out or maybe I will just have him do it for me!

Have a good Monday, Knitters.
best, susie

Thursday, October 15, 2009

Egg to Bird Knitted by Alana Dakos!

Hi Knitters,
Oh my goodness! I am so excited about all of this. Alana Dakos, of the Never Not Knitting podcast and blog fame, interviewed me for her show last week and the show is now up. Click here for the show and show notes. This interview was a fun one to do, there is a lot of silliness.

She knitted up, in about a day or so, the Egg to Blue Bird reversible project from my new book, Itty-Bitty Toys, out of the spectacular organic cotton/wool blend, O-Wool. This is the yarn I used in the book as well. While you look at Alana's gorgeous photos of the reversible Egg to Blue Bird project in the book, you just have to listen to Alana's three-year-old daughter talking about her new toy. It is incredibly sweet and cute! Click to play this short audio of her daughter here:


Hatching....
into a tiny blue bird.
Alana has the most amazing photography on her blog. You have to see it to believe it.
That is one cute little girl. Her eyes twinkle. I can feel her zest for life just by looking.
You can see that there is a tiny nest for the egg or bird to sit in as well.

To see the first project knit up from the book and then displayed in such a phenomenal way has been great fun for me. Further more, to give me permission to share all of your talent with my readers is a great favor.

Thank you, Alana!

best, susie

Tuesday, October 13, 2009

Let me get my glue gun...

Hi Knitters,
I thought you might think this is as goofy as I do. On last Saturday night we had somewhere between 20 to 30 people over to take photographs of their kids before the homecoming dance. We had appetizers and soft drinks and tons of photos were taken. It was fun.

One girl's wrist corsage fell apart just minutes after she slipped it on. There were six tiny white roses and five of them fell off, pretty disappointing. One of the roses was lost for good. While the other four roses were being gathered up I noticed there was a corsage crisis in the making. All of sudden I felt a bunch of eyes looking at me! Yeah, let's ask the knitter, she can fix it.

My first attempt was to pin the roses back onto the base of the corsage. That was a disaster. The other moms were talking about Super Glue as an option. I may have had Super Glue at some point but after all of the renovation turmoil I have no idea where it might be. Then the glue gun option came up. I knew I had a glue gun in my basement somewhere. I ran downstairs and started digging in bins. I was feeling some serious corsage repair pressure.

I struck it rich. I actually found three glue guns. Don't ask.

I ran up the stairs to the party clutching my glue gun and extra glue sticks. My statement when I emerged was, "That was nothing short of a miracle!" That drew some laughter. I started gluing the corsage together and when I looked up I realized that several parents were taking my picture while I was trying to piece the corsage back together. Why on earth?

I managed to fix the corsage and it looked pretty darn good, close to perfect.

When one of the parents sent photos of the kids at the gathering to me (and other parents) today there were photos of me with my glue gun included. I couldn't believe it. That's not right.

The dad did tell me later that they used the photos of me with my glue gun at the florist to show how the corsage fell apart and had to be repaired. They got a full refund!

Glad to be of service.
best, susie

Sunday, October 11, 2009

With Seeds, Please

Hi Knitters,
I could not get over the adorable photos and kind email I received yesterday. With permission, I am sharing both with you:

Susan,

I had the opportunity to knit three watermelon hats for my daughter and my friend's two little girls. When I was done, I had this idea for a photograph. I thought you might want to see it. The hats are so cute and the girls look so cute wearing them. Thanks again for all of your amazing hats. It would be such a treat to have another one of your books on new hats!!

Sincerely
Rhonda Gibson
Stony Plain, Alberta Canada

Well, Rhonda, seeing your sweet, cute girls makes me want to do another hat book! Thank you for sharing with me. It made my day!
The Watermelon Hat is my free pattern and you can click here to get the pattern!
The yarn is Spud & Chloë Sweater in Watermelon, Grass, Ice Cream with a dash of Rootbeer. How yummy is that?

On another note, I would like several yards in each of these fabrics. Please? (Or even a yard or two in a couple colorways would be great:)

My sister and I have one more quilt class to go. It was funny because they added another class after we signed up meaning we thought there were three sessions and there are four. I am glad we found out! I need to work on my quilt today for a bit.

We are almost done with the quilt and I will share that with you when it is complete. I am doing well in the class and I am enjoying it very much. I find that when I am working at home by myself on my quilt I start making things up and the precision flies out the door. That's probably not good. I need to stay on track. The Collector is waiting for my quilt to use for her baby. That will be fun to see.

Have a great Sunday, dear Knitters. I will be back soon and thanks again to Rhonda!
best, susie